Using the CMS
Hello and welcome to Craft 101! Today you’ll be learning how to create posts and edit pages in your handy new content management system!
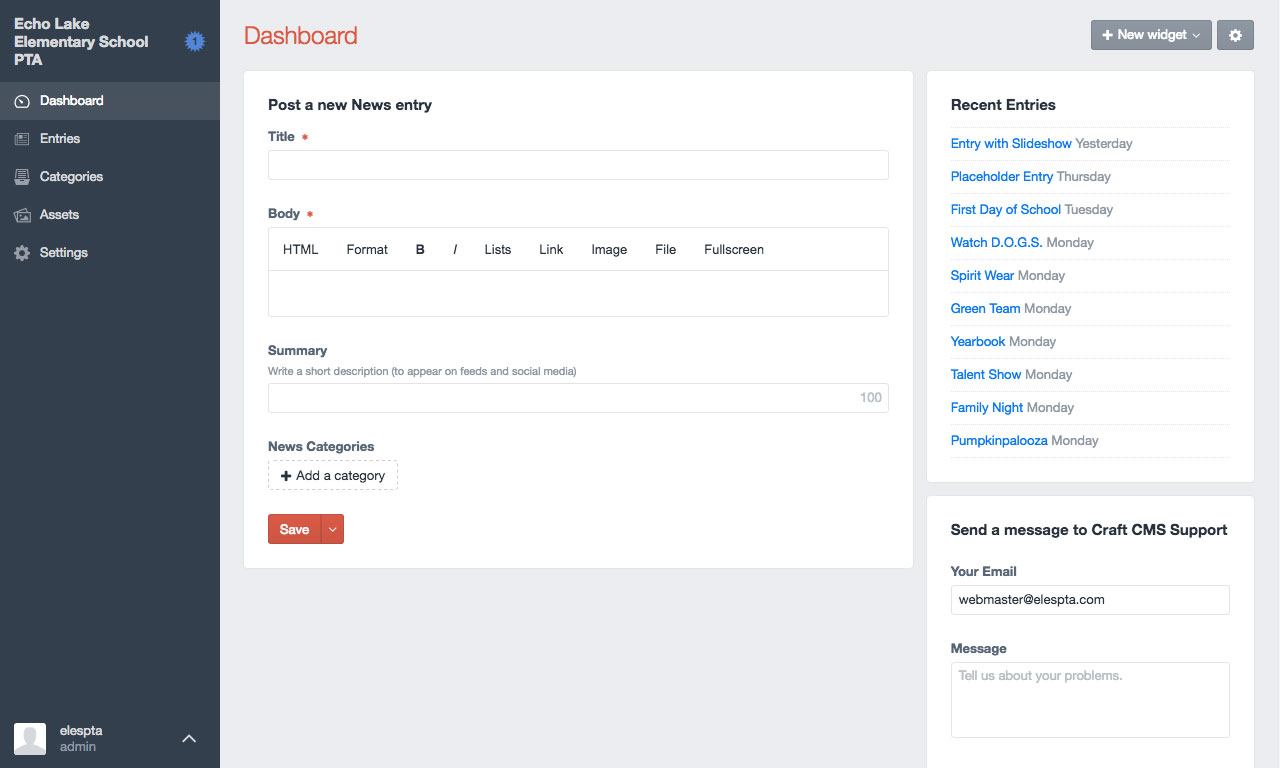
The Dashboard
Upon first logging into the Craft CMS, you’ll wind up first on the Dashboard. It’s currently configured to allow you to quickly post a basic News Entry (we’ll get into the other types soon) and see a list of the most recent entries in every part of the site. Clicking on any item in the list of recent entries will let you quickly jump to edit that entry.
To the left you’ll see the main sidebar for Craft. The title of the site is shown at the top along with a small blue badge showing that there is one update for the software. (You can ignore the updates - I’ll take of those as needed.) The five links below that take you to the main control areas for Craft:
- Dashboard: Where you start; see recent entries and post News entry quickly.
- Entries: Where you’ll spend most of your time, either adding new pages or editing existing ones.
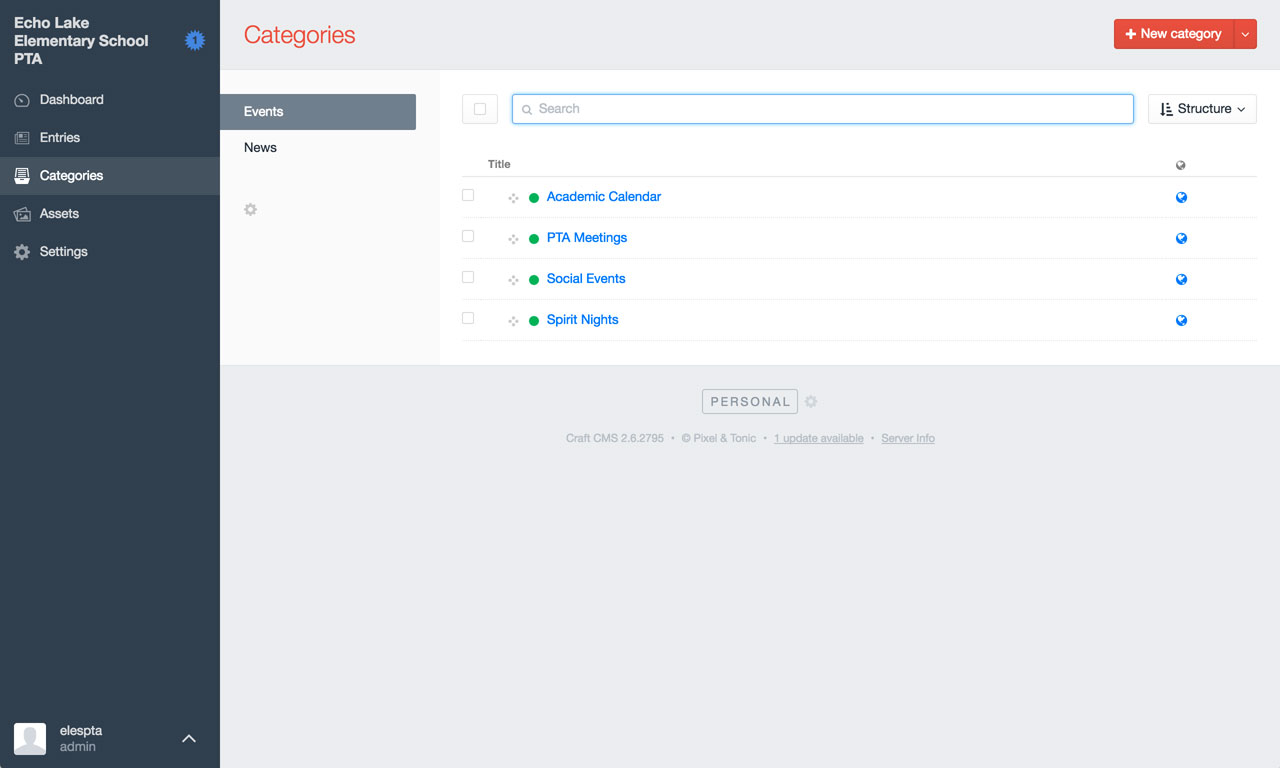
- Categories: Where you can find, edit, or create new categories for News and Events
- Assets: Where you can find, add, or remove images and files outside of attaching them to individual pages or entries. (I recommend adding them via entries as much as possible.)
- Settings: This area contains most of the global settings for the CMS. You shouldn’t need to edit anything in Settings, and making changes here could have global ramifications for the site.
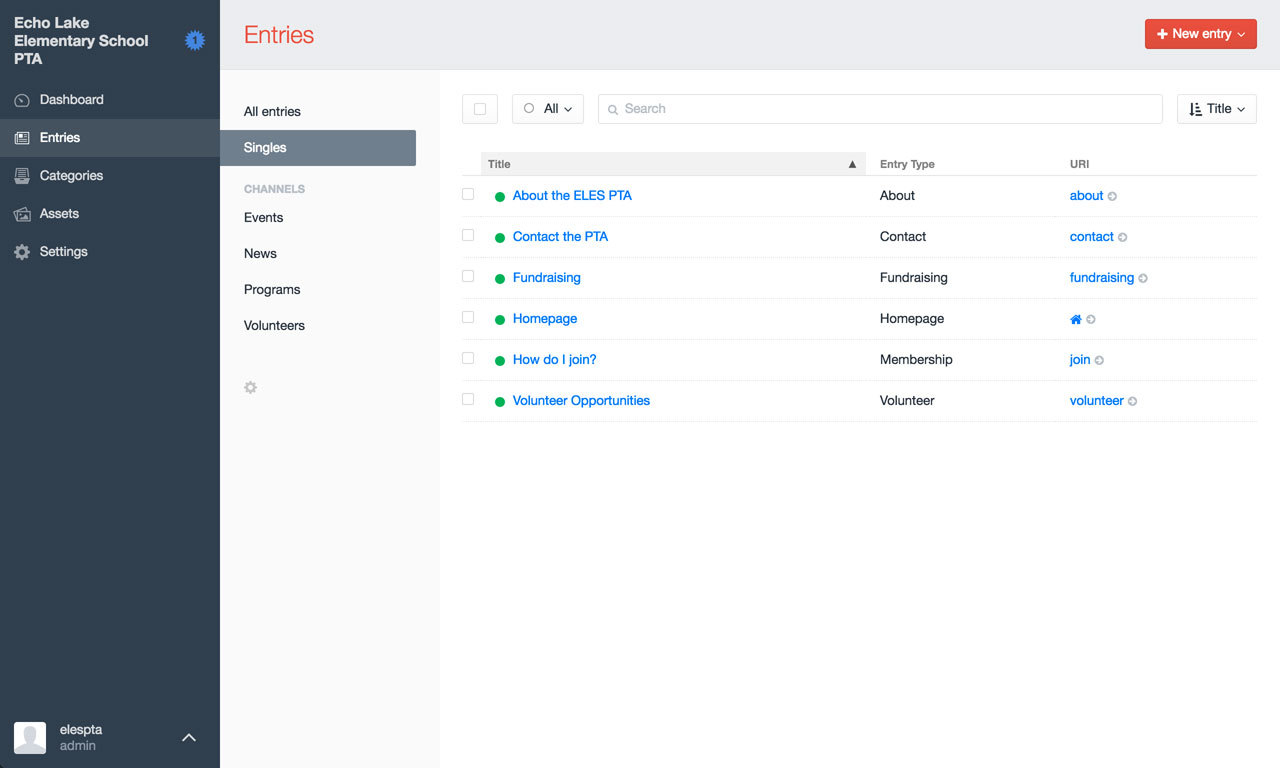
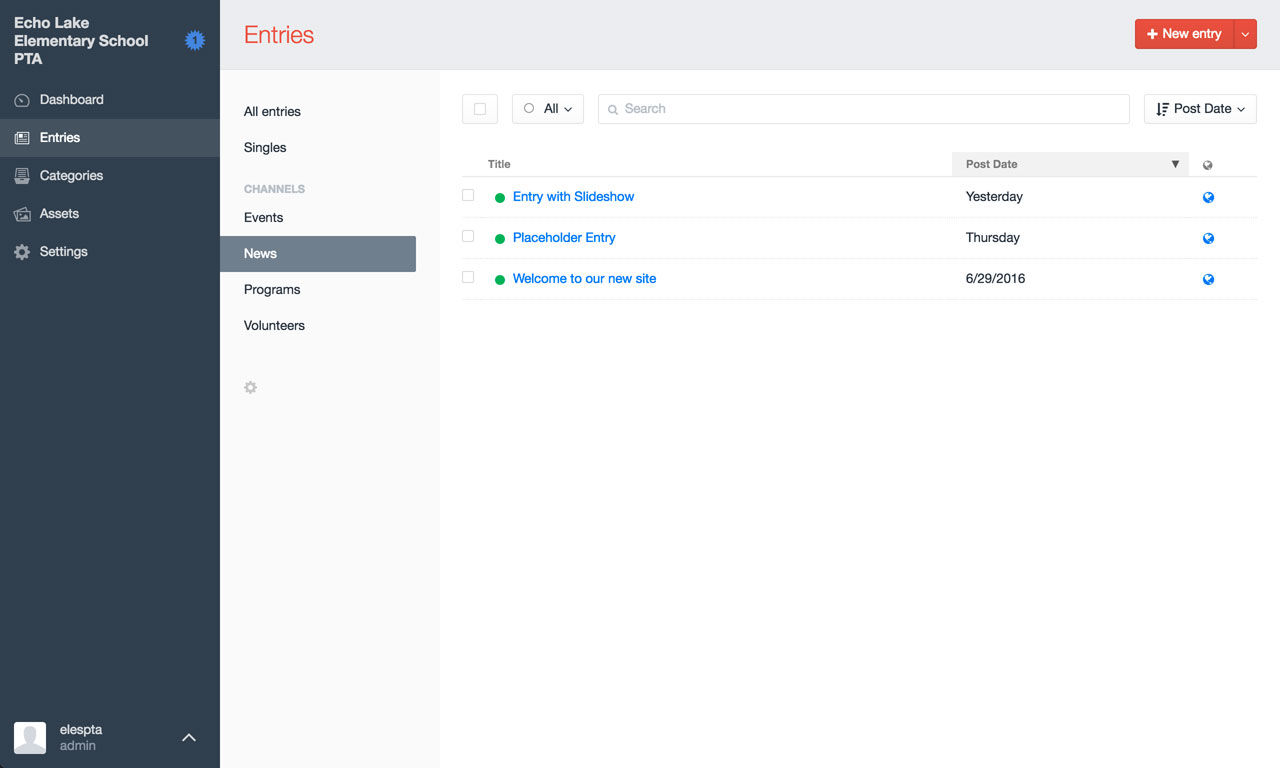
Adding New Entries
The Entries section within the CMS is where you’ll edit the majority of your content. The list to the left (All entries, Singles, Channels, etc.) allows you to navigate between the content of different sections of the site. At the top right corner, you can add new entries to the site. (On the All Entries and Singles sections, you can choose Channel to add an entry in. Once you’re in a selected Channel, it will default to adding a new entry within that Channel.)
- Singles: Individual pages that don’t have related sub-sections. For instance, the homepage, About page, Fundraising page, etc.
- Events: Events have a start date and time and an end date and time associated with them. They may have a location, and they may have further information about the event.
- News: There are three types of News entries: Basic (with a title and body), News Story with Image, and News Story with Slideshow. The latter two allow you to add a photo or multiple photos (in an automatic slideshow) to the top of your news entry.
- Programs: Program pages are similar to the Single pages in that the content can be more free-form using reorderable Blocks.
- Volunteers: This is the only Channel that doesn’t generate individual pages for each entry. Instead each entry is added alphabetically ordered to the bottom of the Volunteer page with the entry details.
Additional tips and tricks:
- You can save entries as drafts (meaning they won’t show up on the live site) by clicking on the downward facing arrow to the right of the Save button at the top right. To publish the entry later, you’ll need to click the download facing arrow next to the Save draft button again and select Publish draft.
- You can set entries to expire (or disappear from the site) on a certain date. This can be particularly helpful for Events - by setting an Expiry Date a few days after the event occurs, it will disappear from the site and the listing.
- On the entry listing screens, you can search for specific entries, filter them by status, or sort them by fields. You can even show more fields related to the entries by clicking the gear below the Channels. (I’ve tried to set some helpful defaults, but you can always change them.)
- Each section has a default social image so if you forget to add one or don’t have one that fits, it will still have something visual when people share pages from that section.

Adding or Editing News
News entries are a quick way to share helpful information, highlight important things that have happened, or begin a discussion.
Required fields
- Title: This is the name of the news article. Think of it like a headline, and keep it short and succinct. (The title also informs the link for the page and appears as the page title when the page is shared.)
- Body: This is the bulk of the content for your article. Use lists and formatting to help make text more easily scannable.
- Entry Type: If the Entry Type is News Story with Image or
with Slideshow, one of the following will also be required:
- Featured Image: Upload a single image, preferably in JPEG format and roughly sized to 1200 x 660.
- Slideshow: You can upload multiple images, still preferably in JPEG format and roughly sized to 1200 x 660.
Optional fields
- Summary: A brief description of the content for the page that will appear in search results and social sharing. (The summary is also shown when the page is listed elsewhere, like on the homepage slide show or on the News index page.)
- Social Image: An image associated with this article that will appear when it is shared on Facebook or Twitter. (It will also be shown on the homepage slide show if this is a Basic News entry.)
- News Category: What category of News story is this? Think of Categories like major sections within a bookstore - how would this entry be organized compared to others. Some example categories I’ve added include Celebrations, Teacher Spotlight, Meeting Minutes, and General Information.
Adding or Editing Events
Events are tied to a specific day (and sometimes time) and often a location as well. You can also add more information to events to help people prepare and plan.
Required fields
- Title: This is the name of the event. Think of it like what you’d you write on your calendar for a big event, and keep it short and concise. (The title also informs the link for the page and appears as the page title when the page is shared.)
- Start Date: When does the event start? If it’s an all-day event, choose 12:00am for the start time.
- End Date: When does the event end? If it’s an all-day event, choose 12:00am for the end time as well.
Optional fields
- Body: This is the associated details for your event. In most cases, this should have plenty of content. Do people need to bring anything? Are there special instructions? What questions might they have? Try to address questions and help people plan for the event successfully.
- Location Details: Many events will take place at a specific location - the optional location fields help provide the necessary details for people to find it.
- Summary: A brief description of the event that will appear in search results and social sharing. (The summary is also shown when the page is listed elsewhere, like on the homepage slide show or on the News index page.)
- Social Image: An image associated with this event that will appear when it is shared on Facebook or Twitter. (It will also be shown on the homepage slide show.)
- Event Category: What kind of event is this? Think of Categories like major sections within a bookstore - how would this entry be organized compared to others. Some example categories I’ve added include Academic Calendar, PTA Meetings, Social Events, and Spirit Nights.
Adding or Editing Programs
Programs are a coordinated set of events or projects that revolve around a specific theme. They may be time-limited or not, and they may or may not occur on specific dates.
Required fields
- Title: This is the name of the program. Think of it like the name of a book, and keep it brief and meaningful. (The title also informs the link for the page and appears as the page title when the program is shared.)
-
Body Content: This is a very flexible type of content, allowing you to pick and choose what layout and styles you want to appear. Want a program page with a slideshow (to show off pictures of past events)? Then you can add a slide show block. Does your program require some action from parents or children that links elsewhere (like a signup form or submission form)? Add a Call to Action block.
Optional fields
- Summary: A brief description of the program that will appear in search results and social sharing. (The summary is also shown when the page is listed elsewhere, like on the homepage slide show or on the program index page.)
- Social Image: An image associated with this program that will appear when it is shared on Facebook or Twitter. (It will also be shown on the homepage slide show and program index page.)
Adding or Editing Volunteer Opportunities
Volunteer opportunities act slightly different from the other Channels. They don’t create individual pages when you add new ones.
Required fields
- Title: This is the name of the opportunity. Think of it like an employee title, and keep it short and understandable.
- Volunteer Description: What should volunteers expect to do in this role? How can they help out?
Optional fields
- Volunteer Email Address: What email address should people contact to help out with this opportunity?
Adding or Editing Categories
You can add or edit categories from the Categories section of the CMS sidebar. They are grouped into the News or Events section. You can add new categories either directly from the Categories section or when adding a new entry by selecting the Categories field. Categories have two fields: a title (the short name that appears) and a summary (a brief description to further explain the category). The summary is not necessary but can be helpful. It will also appear on the category listing on both the news and events index pages.
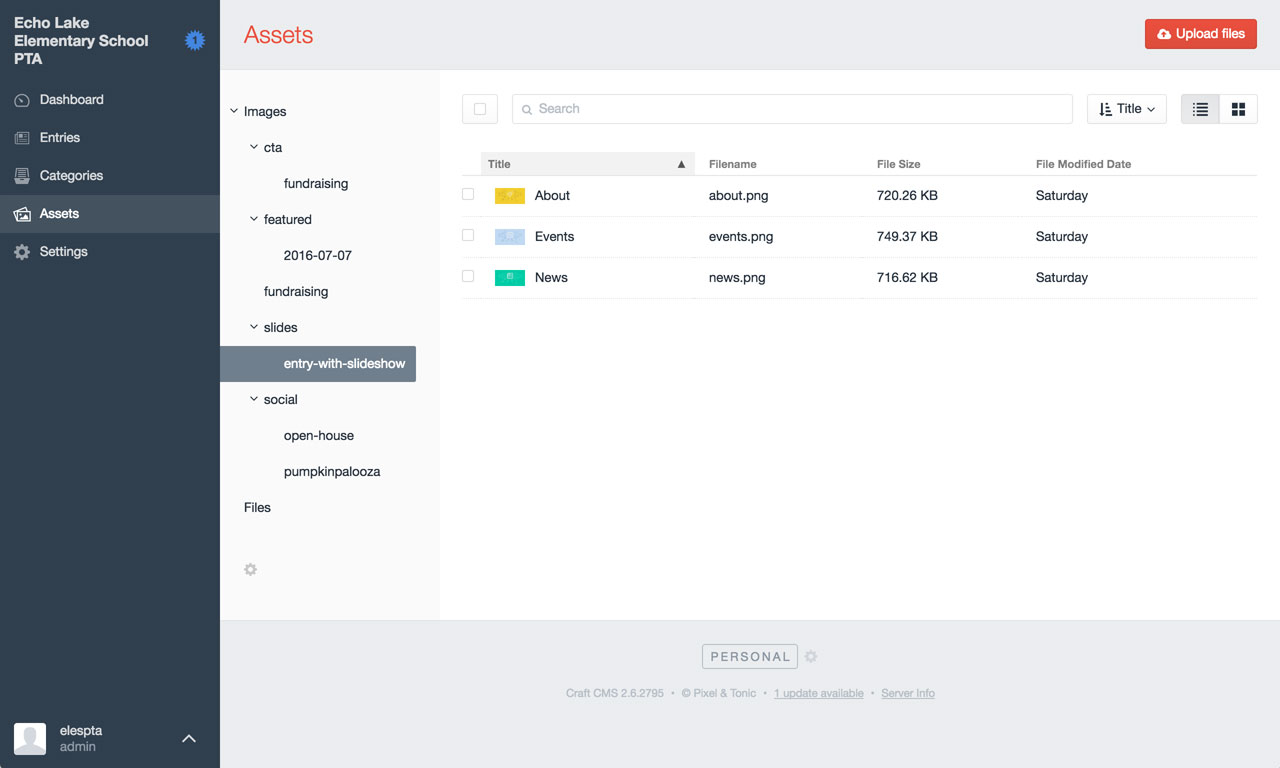
Managing Assets
You can explore and manage all of your uploaded images and files from the Assets section. The list to the left can be expanded to show nested subfolders. Clicking on any folder will show any images that are inside. (If there are no images, check the subfolders.)
You can manually upload images and files here, but I typically recommend uploading them directly from the page or entry they will be related to. It’s much easier to find and connect them that way, and they should be automatically sorted into the proper location.
Additionally you can delete and rename files here if necessary. I strongly recommend against deleting images here because it can result in images or files that are linked on your pages disappearing (and showing up as broken) unless you are careful to update the links on the corresponding pages.
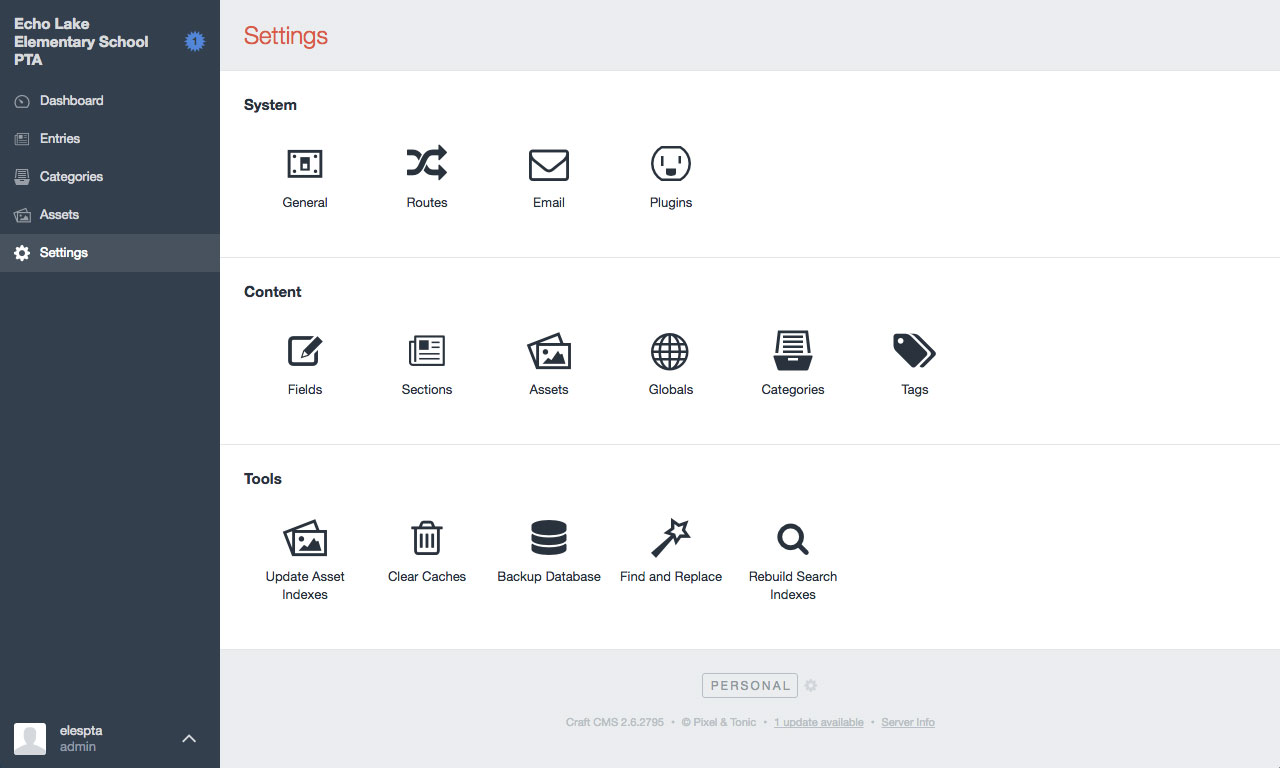
Settings
There’s a very good chance you may never need to use the Settings screen. Many of the settings can break the site structure or content if you aren’t careful about what changes you make.
Some useful tools:
- Find and Replace: Did a role on the PTA change hands? Need to update a contact or program name throughout the site? Find and Replace can speed the process up dramatically.
- Clear Caches: Some pages may get cached on the server to speed up load time because they don’t change often. If you make a change to a page and it seems like the old version is still showing up after a refresh, clearing the caches on the server could help.
- Sections: There may be rare occasions when you need to add a single page outside of one of the major sections. You can do that from this part of the Settings panel. See below for more on this:
Adding a new page
So you want to add a new individual page outside of the major content areas. Here is what you’ll need to do. (Or you can contact me for help.)
1.

Create a new Section under Sections in Settings with the following information:
- Name: The name of the page should be short and descriptive.
- Handle: The handle is used within templates to link to the page directly. The default from the name is usually fine.
- Section Type: For a single page, choose Single. For anything more complex, get in touch with me as you’ll likely need to build extra templates.
- URI: The URI is the portion of the website link that
comes after
https://elespta.com/. The default generated when you add a name is probably fine; if you have a very long name, you may want to consider ways to shorten the URI. - Entry Template: For best results, use
pagehere. That will give you a template similar to the Fundraising and Join pages with Blocks that can be customized to nearly any kind of content.
2.
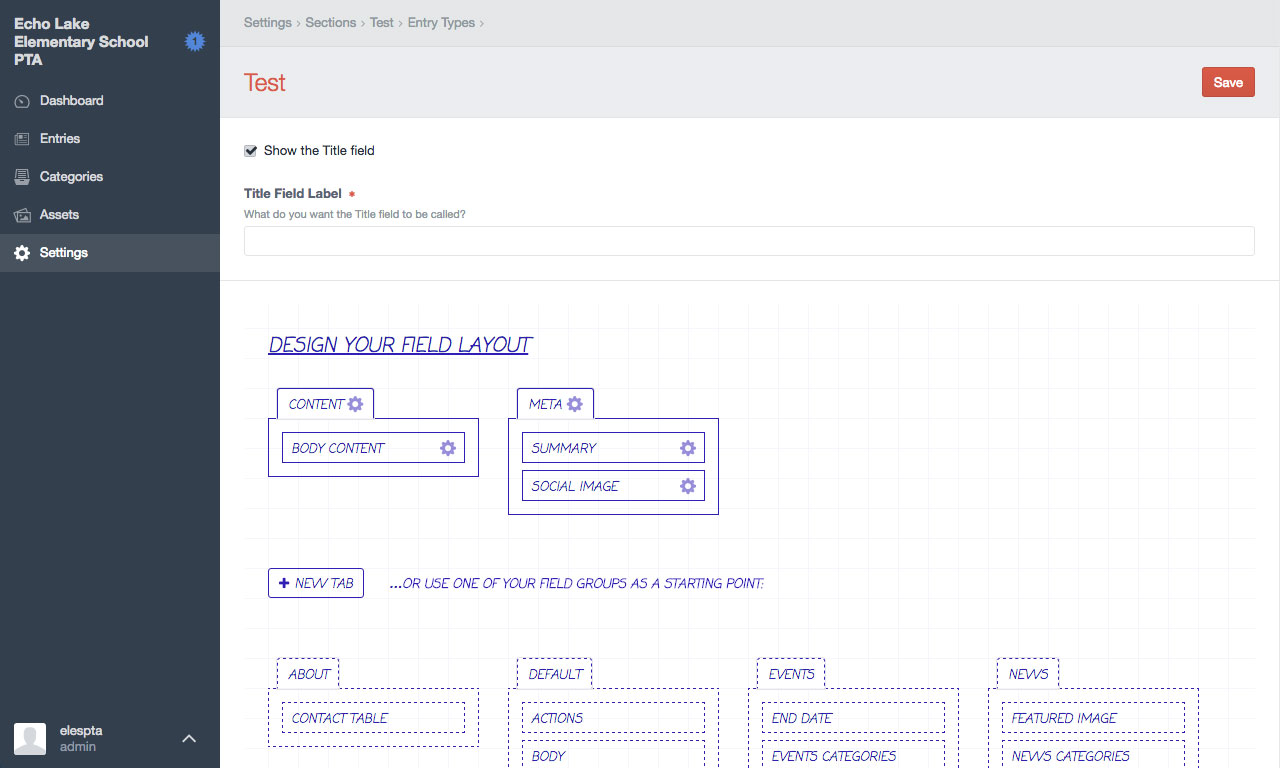
Click on Edit Entry Type to the right after creating your section.
- Click the
Show the Title fieldcheckbox at the top if you want to edit the title of your page. - Create a New Tab labelled
Content. (Click the gear to rename.) - Add the
Body Contentblock from the Default list by clicking and dragging it in. - Create another New Tab and name it
Meta. - Add the
Social ImageandSummaryfields from the Default listing below.
3.
Finally, head over to your Entries and your new page will appear under the Singles section. Add some content, hit Save and voilà. You have a new page!
Style Guide
A brief guide to the basic visual styles for the site, including typography, colors, iconography, elements, and the grid.
Using the CMS
A quick introduction to editing the site using the Craft CMS, including how to post news and events and create new pages.
On Blocks
A step-by-step intro to block components and their various permutations, with annotated examples of each.